Bootstrap Checkbox Field
Overview
In some instances the easiest items might actually get quite necessary-- especially as you come to need them. For example how do your website visitors connect with the pages you build specifying a simple Boolean act-- just yes or no regarding a couple of the thoughts you have to request, just how they do confirm the conditions and terms or perhaps line up a handful of the feasible preferences they might have. We most likely surpass this without paying much of an interest to the component liable for such activities still, the Bootstrap Checkbox Example is really a really serious feature-- one our forms can't really do without.
In the most recent fourth edition of the Bootstrap platform we are offered with the
.form-check.form-check-label<div>.form-check.form-check-label<label><input>.form-check-inputSteps to apply the Bootstrap checkbox:
Bootstrap's
.button<label>data-toggle=" buttons".btn-group
<div class="btn-group" data-toggle="buttons">
  <label class="btn btn-primary active">
    <input type="checkbox" checked autocomplete="off"> Checkbox 1 (pre-checked)
  </label>
  <label class="btn btn-primary">
    <input type="checkbox" autocomplete="off"> Checkbox 2
  </label>
  <label class="btn btn-primary">
    <input type="checkbox" autocomplete="off"> Checkbox 3
  </label>
</div>
Once in a while we need to have the checkboxes to arrive in our forms without the user truly having the capacity to get any sort of action selecting them-- that is definitely where the disabled option comes in.
To disable appropriately a checkbox in Bootstrap 4 using the common HTML attribute
disabledOn the occasion that you find appealing the tip and indeed want to execute this you should designate the
.disabled.form-checkOne more representation
Whenever you are applying checkboxes, wrap them in a
<label>.custom-control.custom-checkboxApply
.custom-control-input<input>Also utilize two
<span>.custom-control-indicator.custom-control-description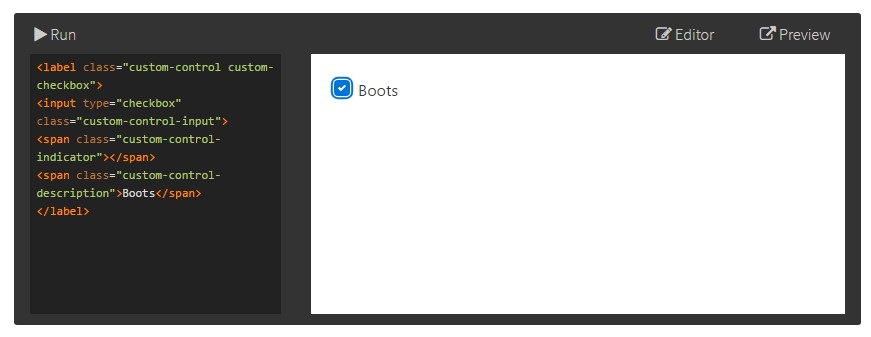
<label class="custom-control custom-checkbox">
<input type="checkbox" class="custom-control-input">
<span class="custom-control-indicator"></span>
<span class="custom-control-description">Boots</span>
</label>
Bootstrap Checkbox HTML forms
Default checkboxes and radios are upgraded upon with the support of
.form-checkDisabled checkboxes and radios are assisted, however, to supply a
not-allowed<label>.disabled.form-checkA new stuff for the Bootstrap version 4 system is the arrival of the so called custom made form elements. These are the identical elements we are known within practicality yet styled far more eye-catching and with the Bootstrap manner. Utilizing them you can bring in amazing excitement as well as personality to your content by simply delegating a couple of extra classes to the commands you include in your forms.
In order to apply customized checkboxes wrap them within a
<label>.custom-control.custom-checkbox<input>.custom-control-input<span>.custom-control-indicator.custom-control-descriptionConclusions
That's essentially all that you should work on in order to bring in a checkbox component for your Bootstrap 4 powered website and provide some custom made flavor to it incorporating it a quality appearances. Right now everything you require to do is repeat the drill unless you've examined every one of the checkboxes desired are already on the page.
Take a look at several video short training about Bootstrap checkbox
Connected topics:
Bootstrap checkbox formal documentation

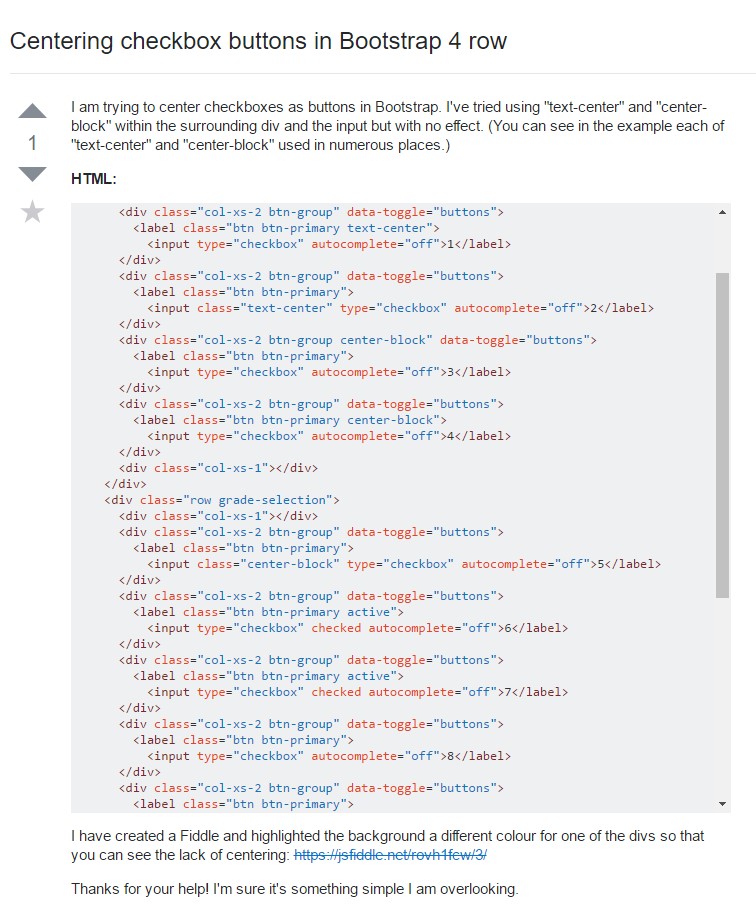
Centering checkbox buttons in Bootstrap 4 row
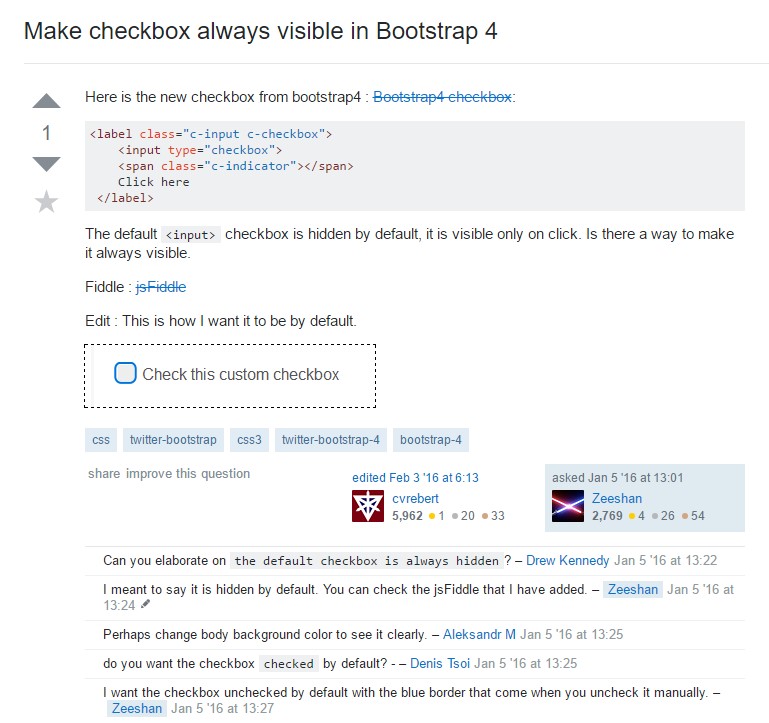
Make checkbox always visible in Bootstrap 4